Using Zoom to set up Recurring and Instant Meetings

Synopsis

In this post, I will discuss how to set up variety of different meeting options on Zoom video conferencing  for both scheduled class meetings and instant meetings or office hours with students. This tutorial will allow you to develop a singular link that can be used throughout the semester so your students will easily be able to use the same address every time you meet either for scheduled course time or for instant meetings. Zoom allows great flexibility with chat and content sharing with both its chat and screen-share options that allow real-time media sharing. Students are able to instantly follow along, receive materials, and focus on particular material even when they are not physically in the room.


Objectives

      This post sprung from an impromptu workshop I did with some of my colleagues who had been using the Zoom platform and wanted to expand the functionality and ease of use of their experience by setting up a recurring class with a singular link. I myself found that with the switch to online learning prompted by the COVID-19 closures, Zoom became a standard go-to tool for meetings and coursework. It was not until I had continued to set up individual meeting after meeting to talk with my students, that I learned there was a way to streamline the process in a way that did not involve me creating and keeping track of dozens of meeting links and times. This lesson will look at the following objectives:

  1. Introduce how to set up a recurring semester-long course or meeting on Zoom with a singular link that can be imbedded into a learning management system.
  2. Demonstrate how to use your personal Zoom ID link to create an instant meeting with an individual or multiple persons.

Content/Instructions

Setting up a recurring meeting:

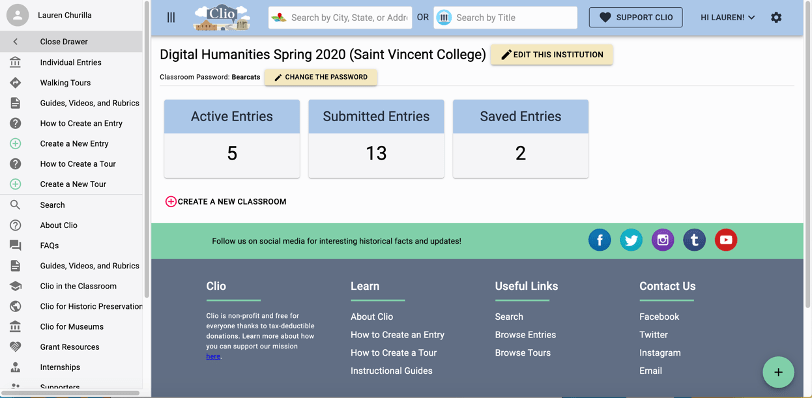
When you login to Zoom, you will be able to set up instant or scheduled meetings. These meetings appear on your dashboard like mine do in my example below.

  1. The first step to setting up a recurring meeting is to click “Schedule a New Meeting” located in the top left quadrant of the page in the gray box. This will bring you to the screen you see below:
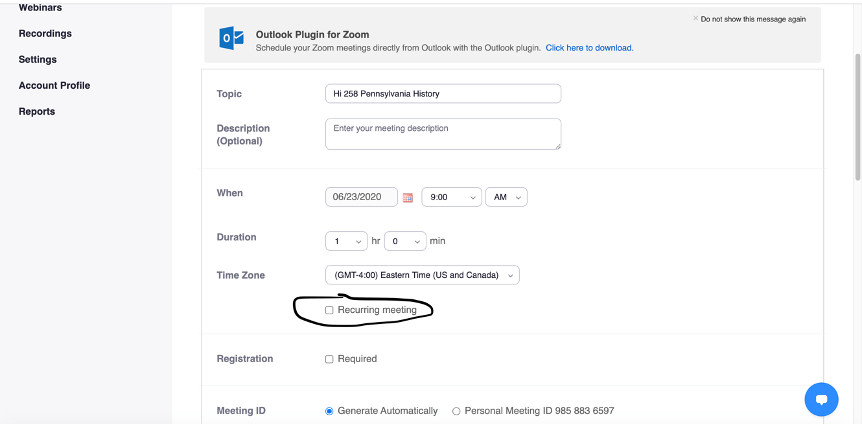
2.

  1. Enter your course name and then click the box called “recurring meeting.” Once selected, the options below will appear.
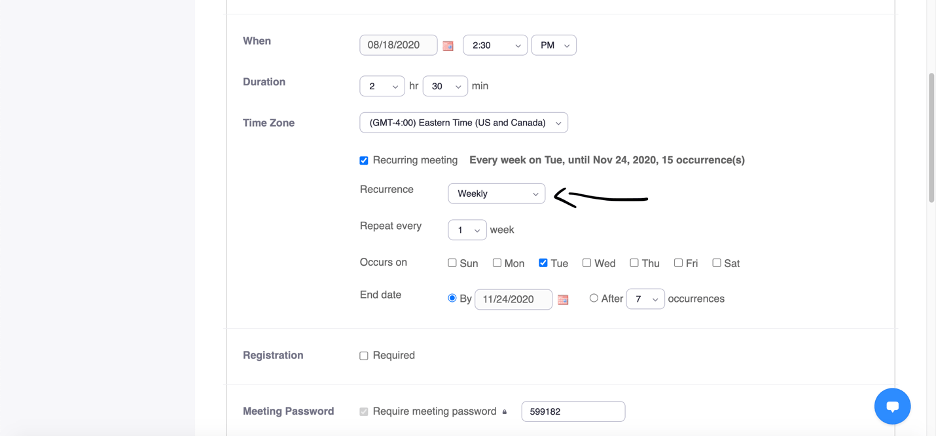
  1. In the “When” box, select the date of your first meeting and the starting time.
  1. In “Duration,” select the length of the meeting. I am teaching a once a week class that lasts 2.5 hours with a start date of August 18, 2020.
  1. After this, you can select the meeting’s recurrence. Zoom allows you to select daily, weekly, monthly, and no fixed time meetings. I have chosen weekly since my class meets once a week. If your class will be meeting multiple times, simply select all of the weekdays days that the course will meet synchronously.
  1. You then have the option to select an “End date.” I find it easier to put in a calendar date than select the number of occurrences option. My course meetings will end the week before Thanksgiving, so I have selected the last day of class as the end date.
  1. After this, you can scroll down and set up the rest of your meeting options.
  1. Here you can select if you would like your participants to have their video on. For a small class or discussion-based class, I find it best to allow video so your students can see each other when they are talking and it allows for a more personal feel. However, if you are presenting a lecturer, turning off participants video may be lest distracting and will help save bandwidth usage. You can turn off participants video at any time, but only they can turn it back on.
  1. Students without a microphone may choose to dial in on the phone in order to talk on the conference. I always select “Both” audio options.
  1. In “Meeting Options,” you can select the settings you would like. “Join Before Host” allows students to enter the classroom, even if you have not yet logged in. I prefer this option because it gives students some time to socialize.
  1. If you “Enable waiting room,” you must manually admit students or participants as they request access. Some people prefer this as it lessens the opportunity for strangers to join your meeting and be disruptive.
  1. If you are going to post the lecture online when you are done, I would recommend the “Record the Meeting Automatically” function. This way, you do not need to remember to hit record for every lecture. This function is nice because it will allow you to save and post the class so anyone who was not able to make it to the live meeting.
  1. If you are team teaching, you can add another host into the meeting in the “Alternative Host” box. By giving another person hosting privileges, they can also mute and unmute participants or remove disruptive persons from the meeting.
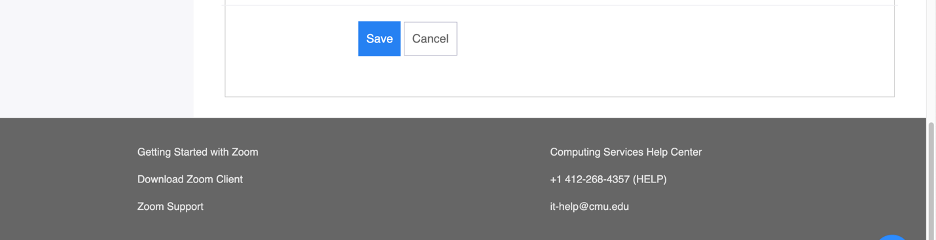
  1. Finally, click the “Save” button:

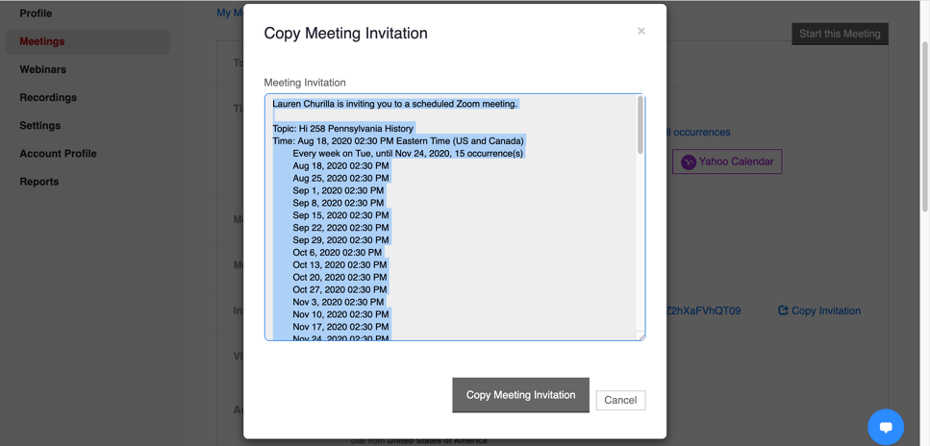
15. When you are done, a meeting link will generate. In order to share this with you class, copy the invitation by clicking the link circled below:

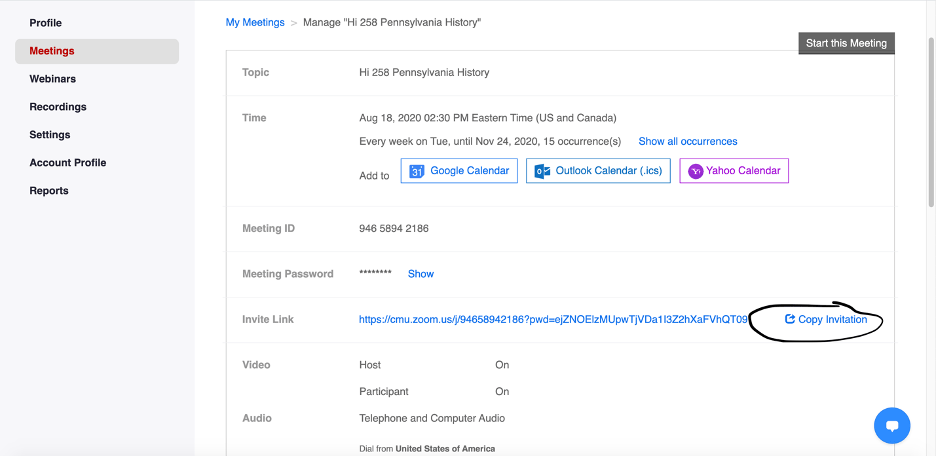
16. This invitation can be shared via email or embedded into a learning management system.

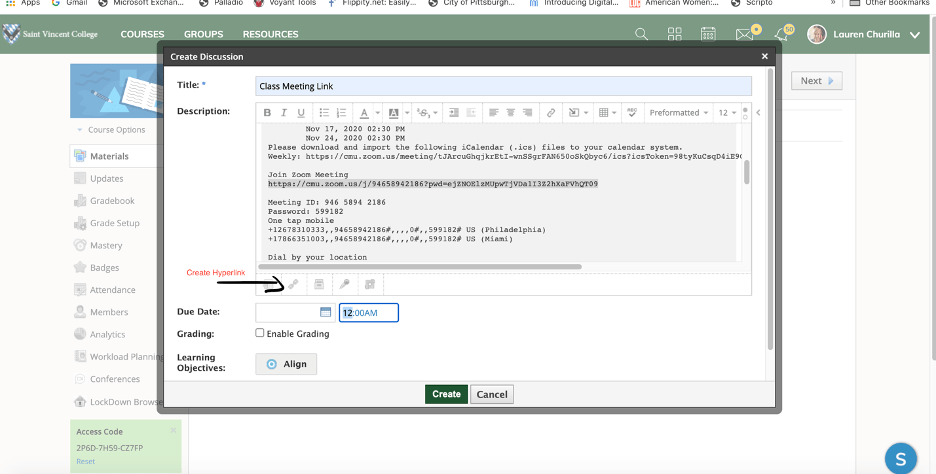
  1. I am embedding my meeting into Schoology so that my students will easily have access to the link. I created a folder called “Class Meeting Link” and posted the full invitation. For ease of access and for students who do not want or need to scroll through all the information in the full invitation, I created a hyperlink for the “Join Zoom Meeting” link using the hyperlink tool in our LMS.
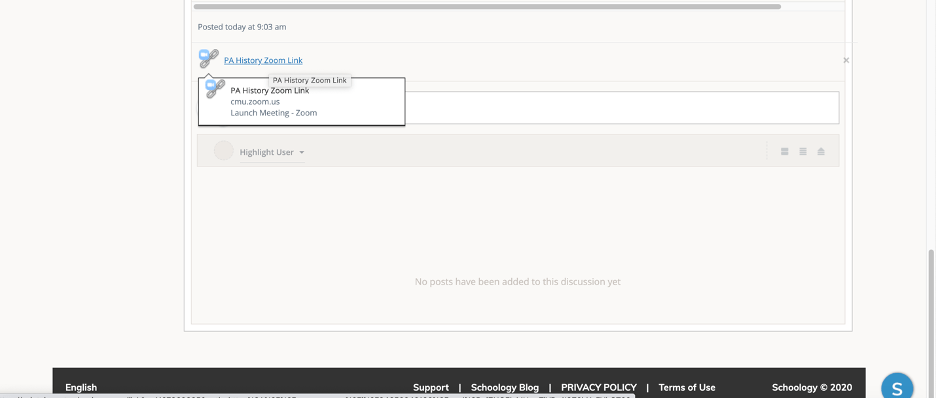
  1. The final result will be an easy link for students to click on to enter the Zoom class. Both instructor and student will use the same link every time and the link will work for the duration of the semester.

Setting up an instant meeting:

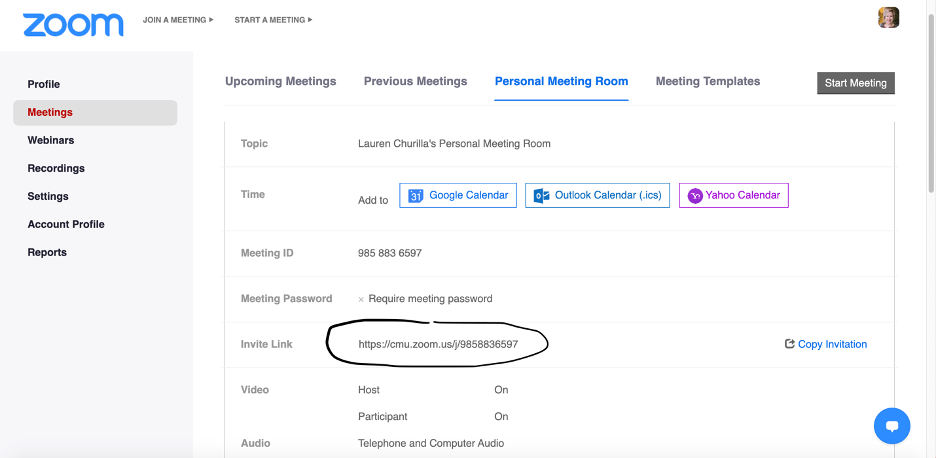
  1. Go to your personal meeting room.
  1. Copy your personal meeting link and follow steps 18 and 19 above. I typically will embed my personal meeting link into my LMS as “Office Hours.” This link will allow you to meet with anyone at any time instantly without setting up a meeting.

Positives/Challenges

Positives:

  • Zoom allows synchronous teaching with students that includes the ability to visually see a large number of students, allows audio and screen sharing, and can be used for text chatting. Course material can be distributed in real time vie the chat function or through screen sharing.
  • Automatically enabled recording or the ability to record quickly and easily converts the lecture or meeting to a video file that can be saved or distributed to participants not able to join in real time.

Challenges:

  • Zoom can sometimes have technical difficulties. It is very important to have sufficient bandwidth if you will be using full video capabilities with students or participants. Without this, sound and video tend to cut out or freeze making it difficult to have easily conversation. This can be solved by making sure the host has sufficient internet capabilities or my muting the video footage of participants. The lack of bandwidth can be particularly difficult for students living in areas that have less digital infrastructure and are functioning with lower speed networks.
  • Time planning can be a bit challenging as students may not enter the classroom at the same time and may come in a bit late. This can be solved by recording classes for students who may not have been able to join or fully participate in real time. Additionally, be prepared to not have the full time of the class to teach, as you may feel like things take a bit longer on a conference.
  • Without a paid subscription, Zoom meetings are limited to 40 minutes for anyone not in a K-12 educational setting.

Clio in the Classroom Geomapping Assignment

Synopsis

In this post, I will explore the crowdsourced public history application The Clio that can be found online at https://www.theclio.com/. The Clio is a collaborative history based educational mobile app and website that maps and documents thousands of historical and cultural sites and institutions across the United States. Every Clio entry synthesizes historical information about a site with images, videos, and links to source material to create a robust historical record. The Clio offers an excellent alternative to a research paper and allows students to understand what goes into the process of creating digital texts and resources. The project helps students increase their own digital literacy while also contributing to an important digital history project. The Clio offers a great option for students to adapt traditional academic writing skills to develop research-based quality content written for a public audience. This assignment helps students synthesize writing skills, secondary and primary research, and historical analysis while they interpret historically and culturally significant places and events.

 The Clio Project hosts a fantastic free digital classroom feature called “Clio in the Classroom” that I have found to be quite a wonderful tool. The classroom feature allows students to create individual entries and offers a robust amount of instructional material and videos to assist students in the creation of their entries as well as instructional resources for educators. The classroom feature does not require students create an account, rather only to sign into their classroom with a single log-in. On the administrative side, there is a screen that allows the instructor to give feedback.


Objectives

I have used The Clio Project for several years in my Pennsylvania History and Digital Humanities classes as an alternative to a traditional research paper. Students can use this tool on their phone or on a computer so it is easily accessible to students without a computer or reliable internet access. I have found greater engagement with this project and more quality results as I have found my students excited to participate in a project and produce something that is part of a real public project. Also, because they are aware that they are contributing to a public forum, they seem to be more accountable with the quality of information they are creating and more attentive to citations. This past semester, I worked with a colleague and we had our students create entries for Pennsylvania Historical Markers of significant women. We came up with a list of 70 entries and when the project is complete, we will create a state-wide tour in The Clio of these sites. I have found it better to give students a list of topics or places, because all entries must be locationally based and students sometimes have difficulty selected a topic that can easily be plotted on a map.

The Clio Project Assignment consists of the following objectives:

  1. Students will locate and assess credible sources using digital tools. Students will also demonstrate their capacity to utilize library and archival resources.
  • Students will demonstrate historical thinking skills in their research and writing, including analyzing primary and secondary sources, synthesizing information, explaining change over time, providing historical context, assessing claims and evidence, and incorporating multiple perspectives.                                                                                                          
  • Students will review and incorporate the work of scholars within their entry to provide historical context.
  • Students will provide feedback for their peers and also seek feedback from peers about their work. Using this feedback, along with feedback from their instructor, students will review and revise their entry prior to submission.
  •  Students will incorporate facts throughout the narrative drawn from credible sources. Students will demonstrate their ability to write credible content for a public audience utilizing an advanced digital platform.
  • Students will demonstrate the capacity to navigate Clio and other digital tools such as databases and search engines for conducting research online.
  •  Students will create entries that integrate digital media such as text, images, videos, audio files, and links to credible sources. Students will demonstrate the capacity to cite and format these sources appropriately in their Clio entry.

Objectives taken fromDavid Trowbridge, Clio in the Classroom: A Guide for Educators, accessed June 23, 2020, https://www.learningoutcomesassessment.org/wp-content/uploads/2019/02/clio.pdf


Content/Instructions

The Clio in the Classroom allows you to create specific dashboards for each class you teach. Every class has a unique login that students can use to access the class and create an entry. From the instructor side, you can see student progress in real time. You will notice that each course has “active entries,” “submitted entries,” and “saved entries.” An entry can only be made active by an instructor. No student entries will be made public while they are being constructed and edited. A student can continuously work on an entry and save it in draft form. When they are ready to submit it for instructor review or grading, they submit the entry.

In the instructor dashboard, submitted entries show each student’s name (redacted for privacy), the topic they chose, along with the word count and completeness of all the required pieces.

When you click on an individual entry, you can review a student’s work and make comments. There is not a good in-text editor or notation system, so I either type my comments in all caps within the text or use the “comments” tool at the bottom of the page. When an article is ready to go public, the instructor can approve it using the button at the top of the page.

Clio in the Classroom provides a variety of related assignments that can be spread out throughout the course of a semester to extend the project. These include a topic proposal, outline, and annotated bibliography. I have used all three tools in writing designated classes and they provided a nice platform to teach about the writing process. This particular Clio Entry assignment can be done with the related assignments or as a stand-alone project. All four assignments along with the assignment instructions below can be found on the Clio in the Classroom Instructor Dashboard or at https://www.learningoutcomesassessment.org/wp-content/uploads/2019/02/clio.pdf


The assignment (adapted from Clio in the Classroom Assignment Instructions)

Overview

Every entry should begin with an overview or abstract of the topic. The Clio requires 5-8 sentences in the overview section. The overview is meant to convey to the reader the who, what, when, where, why, and how of the topic. This is not an introductory paragraph, but rather a concise overview of what the entry is about.

  • Introduce your historic site or object by explaining what it is and where it is located.
  • Provide a date or general timeframe for when the site gained historical significance.
  • Identify some important figures or groups of people who are part of this site or object.
  • Briefly state the significance of your topic so that readers better understand why it matters. For example, state how your topic notable for being associated with a specific person or event, or is the first or last remaining example of something.
  • Explain whether this site or object is publicly accessible. For example, is this historic site part of a larger institution and open to the public? Is this historic marker on public grounds or alongside a highway?

Backstory

Next, your entry will need to include a substantive backstory section of 3-6 detailed paragraphs. This is equivalent to your introduction, body paragraphs, and conclusion sections if you were writing a traditional paper. The Backstory provides a rich, engaging, and concise narrative of the topic introduced in your Overview. While the Overview describes the site, the Backstory explains its history and significance in more detail. Each paragraph should contain a concise topic sentence followed by evidence to support your topic sentence. Each paragraph should address one topic.

First paragraph

  • Your introductory paragraph should lead readers into a discussion of the history and significance of your topic. It may introduce key points, such as important people, places, events, and dates, which are also discussed later in the narrative.

Body paragraphs

  • In two to four paragraphs, examine the important historical figures and events that took place related to your topic. Explore what led to the creation of your historic site, monument, landmark, or public art, along with important events that occurred afterward. Consider how your topic is part of broader historical narratives, such as social movements, cultural trends, conflicts, or groups of people.

Conclusion

  • End your narrative by reiterating main ideas and the significance of your topic. This is a good place to explore the lasting legacy of your historic site, monument, landmark, or public art and what it means today. It may mean different things to different people, so be sure to look at your topic from a variety of perspectives.

Images

Your Clio entry must include at least three images with citations and 250 word captions. You may include a variety of images including modern and historic photographs, maps, drawings and artwork, newspaper clippings, images of items, videos, etc. Copyright is important, so be sure you are using images with permission. Some historic and modern photos are in the public domain, meaning without copyright. Other images may be only used for educational purposes, which would be acceptable because Clio is educational. Always check with the source before uploading images.

Sources

It is very important to include your citations in the source section. Clio has an automatic citation tool that will help you create an alphabetized bibliography of all sources you used.

Links

Add links to books, websites, videos, or any information you think is interesting and would be useful for a viewer to see that you did not include in your visuals.


Positives/Challenges

Positives

  • The course dashboard and singular login are great to keep everything organized and allow you to see real time editing and creation of entries. I have found this is helpful for identifying student’s issues early on which allows for a good discourse back and forth that allows students to edit and adjust entries in a manageable way.
  • There are so many easy to use short instructional videos and handouts that can be sent to students included in the Clio in the Classroom module.
  • Excellent and timely support in case any issues arise.
  • Only the instructor needs to create an account. Students only need to have the course login information.

Challenges

  • It can be difficult to add edits and notations within your student entries. The comments section is nice,  but does not allow you to annotate text.
  • I have found that students have difficulty citing images and often do not include image citations or captions. In the future, I would spend more time instructing students how to do this.
  • In spite of the requirements to select academic sources, many students continue to rely on tertiary sources and are reluctant to include secondary and primary material into their projects.
  • Many entries require at least some editing before they are approved to go live.

Rubrics/evaluation

The Clio offers editable rubrics and evaluations as part of the classroom package. For my assignment, I incorporate the rubric categories into a digital rubric on my LMS. I am able to then add in any writing assessment categories or core objectives specific to my department by doing this. I have also found it useful to have my students submit a draft and then schedule a time to talk with me one on one so we can look at the entry together and discuss strengths and weaknesses.  This has resulted in  engaging discussion and higher quality  completed entries.